Configuring WSO2 IoT Server with a Federated IdP using OpenID Connect
A comprehensive guide to setup OIDC with WSO2 IoTS
The WSO2 IoT Server is a flexible open source IoT Platform licensed under the Apache 2.0 license with a large open source community. It provides the essential capabilities required to implement a scalable server-side IoT Platform.
In this article, we will be configuring WSO2 IoT Server with the OpenID Connect(OIDC) authentication. The OpenID Connect is a family of specs for the authentication layered on top of OAuth2.0.

As you may already know, Single-Sign-On(SSO) is already available out-of-the-box in the WSO2 IoT Server through the SAML SSO. Just keep it in mind that, WSO2 IoT Server is shipped only with a bounded set of WSO2 Identity Server capabilities. You may need to bring WSO2 Identity Server in to the picture, when you need advanced identity & access management capabilities.
For the OIDC Server, we’ll be consuming readily available IdentityServerV4 demo server; demo.identityserver.io as the Federated Identity Provider(IdP).
An overview of the architecture would be as below;
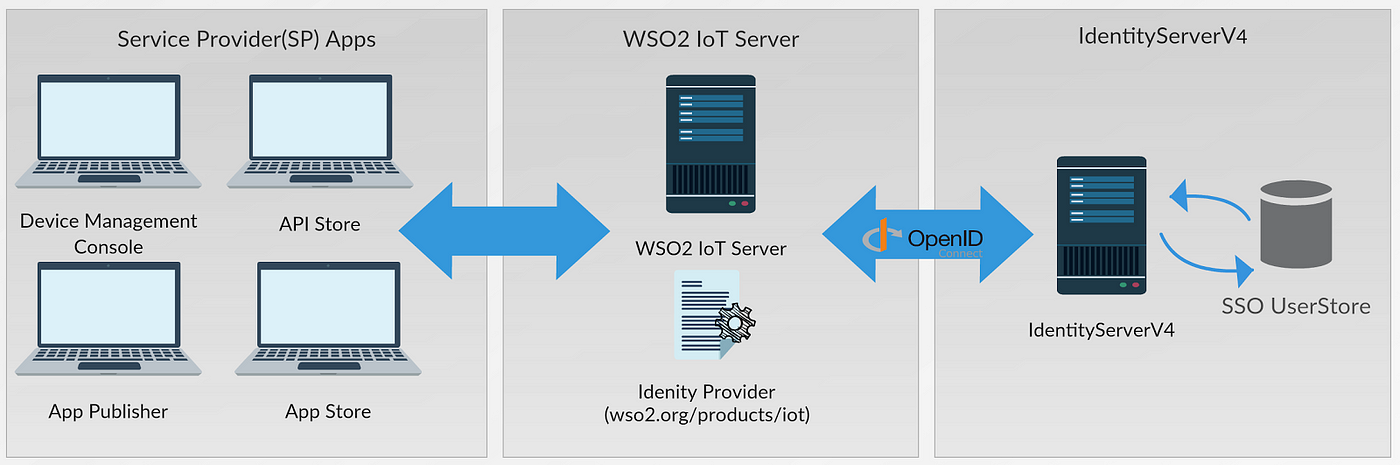
Installing OpenID Authenticator Feature
In order to add OpenID Connect authentication; first we need to install “org.wso2.carbon.identity.application.authenticator.oidc.server.feature” into the WSO2 IoT Server. Following are the steps to install OpenID Connect application authenticator server feature using a maven execution script.
STEP 1 :
Copy and paste following script into a text editor and save it as “openid-extension-deployer.xml” into the WSO2 IoT Server home path (aka. $IOT_HOME).
STEP 2:
Open up a terminal and navigate into the $IOT_HOME path.
STEP 3 :
Issue the following command in terminal to execute the maven script.
mvn clean install -f openid-extension-deployer.xml
2. Configuring the default Identity Provider
We need to configure federated OpenID Connect authentication configurations into the default identity provider configuration; “wso2.org/products/iot”. These configuration includes; information such as client id, client secret, authorization endpoint, token endpoint and call back url etc. Further; claim mappings and role mappings added to support Just-in-Time provisioning.
Open “iot_default.xml” file inside the “$IOT_HOME/conf/identity/identity-providers/” path and replace with the following content.
With the above configuration we have used;
- JIT Provisioning: Allows Just-In-Time user provisioning. A user that doesn’t exist in the already connected user stores; will be right-away created and provisioned through this feature.
- Claim Mapping: Since demo server doesn’t return any valuable claim for the roles list; we used a claim called “idp” as the IoT Server role claim; “http://wso2.org/claims/role”.
- Role Mapping: This allows mapping a remote role name into a local role name. For the demonstration purposes; the value of the idp claim “local” is mapped to the “Internal/devicemgt-admin” IoT Server role. You may use this feature for mapping intuitive remote roles such as “Administrator” into the “Internal/devicemgt-admin”.
3. Configuring Service Provider(SP) Apps
Service Provider(SP) apps are the IoT Server UI consoles. Each console (or SP App) has a relevant configuration file in WSO2 IoT Server. For instance; devicemgt.xml is the configuration file for the device management console.
STEP 1:
Open “devicemgt.xml” file inside the “$IOT_HOME/conf/identity/service-providers/” path. Locate the “<LocalAndOutBoundAuthenticationConfig>” element and replace with the following changes;
STEP 2:
We need to repeat the above STEP 1 for the other service providers as well. Repeat the above step for the other service providers inside the “$IOT_HOME/conf/identity/service-providers/” path.
- API_STORE.xml — API Store app
- store.xml — App Store app
- publisher.xml — App Publisher app
4. Extending Login Page for OpenID Connect
In order to support both LOCAL and OpenID Connect authentication options; we need to extend the current login page.
NOTE: If you need users to always authenticate only via OpenID Connect federated IdP, you should remove LOCAL authentication entry.
Following steps required for extending the login page;
STEP 1:
Create a new folder “abc.com.page.sign-in” inside the path “$IOT_HOME/repository/deployment/server/jaggeryapps/devicemgt/app/pages”.
STEP 2:
Create a new file “sign-in.hbs” inside the above folder “abc.com.page.sign-in” and add the following content.
STEP 3:
Create a new file “sign-in.json” inside the above folder “abc.com.page.sign-in” and add the following content.
STEP 4:
Download and copy image “http://demo.identityserver.io/icon.png” as “openid.png” into the “abc.com.page.sign-in/public/images” folder.
5. Verifying OpenID Authentication
Once all configurations are correctly configured; you should be able to login to the device management console via both local authenticator and OpenID Connect authenticator. Following steps depicts how we can authenticate via OpenID Connect authenticator.
STEP 1:
Restart the server and navigate into the https://localhost:9443/devicemgt path.

STEP 2:
Click on “Sign in with OpenID Connect” option.
STEP 3:
Now you should be redirected to a URL similar to the http://demo.identityserver.io/account/login?returnUrl.

STEP 3:
Since this is a demo identity server; you can enter `bob/bob` or `alice/alice` for the username and password. Then click on ‘Login’ button (continue on the follow-up steps as well).

STEP 4:
Once the authentication is successful, you will be redirected to the device management console. You can also verify whether a new user is created and the role is assigned from the carbon console in the https://localhost:9443/carbon path.