Modbus for Industrial IoT
Connecting Modbus Devices for WSO2 IoT Server
Modbus is a matured protocol and have claimed to be the de facto industrial serial standard since its introduction to the market in 1979. Modbus has allowed millions of automation devices to communicate each other. For the record, Modbus even has a reserved system port 502 on the TCP/IP stack.
For the beginners; Modbus may be confusing and complicated. But trust me, it will be the one of the most simplest protocols when you understand how it works!

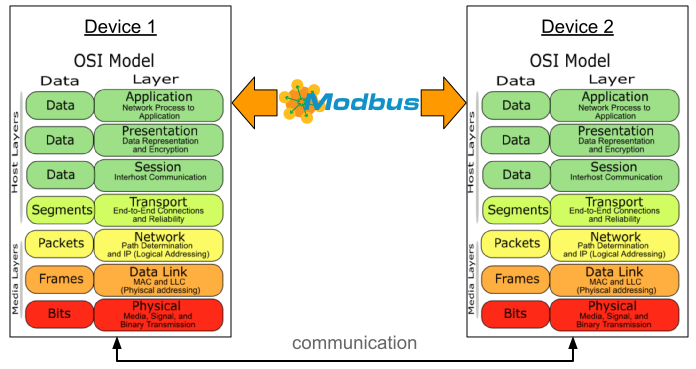
With that being said, Let’s dig into the Modbus protocol. Modbus is an Application Layer protocol. Please refer the image below;
At this level, Modbus is considered as a stateless request-response protocol. In other words, requests initiated by the clients will receive responses from the Server (aka. Client-Server architecture). At the lower level, one of the earliest implementation where real signaling happens through the serial communication; both devices are named as Master-Slave. Thus, to avoid confusion, please refer the image below.

I presume, now we have a notion of how Modbus look alike. Below are the few links for you to get in-depth understanding on Modbus;
Working with WSO2 IoT Server
The WSO2 IoT Server is a flexible open source IoT Platform with a large open source community which is licensed under the Apache 2.0 license. It provides the essential capabilities required to implement a scalable server-side IoT Platform.
With that being in mind, let’s try to implement Modbus support in WSO2 IoT Server. IoT Server does not support Modbus Out-Of-the-Box. However, being an extensible platform we can implement this as a Push Notification Provider. Please refer the image below to get an abstract idea on how Modbus will fit in to the picture of the IoT Server.

Creating Modbus Push Notification Provider
Please refer below documentation link to refer on how to create and add a push notification provider.
For the Modbus push notification, you only need to build a JAR and copy that into $PRODUCT_HOME/lib folder. Then it will be converted into an OSGi bundle by the WSO2 Server and copied into $PRODUCT_HOME/dropins folder when the server starts up. Please note that if you already have OSGi bundles you can directly copied into /dropins folder.
A sample PushNotificationProvider class would look like below;
public class ModbusPushNotificationProvider implements PushNotificationProvider {
    @Override
    public String getType() {
        return "Modbus"
    }

    @Override
    public NotificationStrategy getNotificationStrategy(PushNotificationConfig config) {
        return new ModbusNotificationStrategy(config);
    }
}
ModbusNotificationStrategy is the implementation class for the Modbus communication. getNotificationStrategy() method will be called whenever sending an operation into a Modbus push notification configured device. PushNotificationConfig object contains the DeviceIdentifier{deviceId, deviceType} and the Operation payload.
public class ModbusNotificationStrategy implements NotificationStrategy {@Override
public void execute(NotificationContext ctx) throws PushNotificationExecutionFailedException {
    String slaveHost = "Unknown";
    int slavePort = -1;
    String messageType = "";
    try {
        Device device = getDeviceManagementProviderService().getDevice(ctx.getDeviceId());
        List<Device.Property> properties = device.getProperties();
        if (properties != null && !properties.isEmpty()) {
            return;
        }
        for (Device.Property property : device.getProperties()) {
            String name = property.getName();
            if ("SLAVE_HOST".equals(name)) {
                slaveHost = property.getValue();
            } else if ("SLAVE_PORT".equals(name)) {
                slavePort = Integer.parseInt(property.getValue());
            } else if ("MESSAGE_TYPE".equals(name)) {
                messageType = property.getValue();
            }
        }
        executorService.submit(new ModbusMessageExecutor(ctx, slaveHost, slavePort, messageType, timeout));
   } catch (Exception e) {
        log.error("Failed to publish device with id: " + ctx.getDeviceId(), e);
}private DeviceManagementProviderService getDeviceManagementProviderService(){
    return DeviceManagementProviderService deviceManagementProviderService = (DeviceManagementProviderService) PrivilegedCarbonContext.getThreadLocalCarbonContext().getOSGiService(DeviceManagementProviderService.class, null);
}
}
In the above class, SLAVE_HOST, SLAVE_PORT and MESSAGE_TYPE is derived from the attributes of the device instance. Unlike MQTT and other push notification providers; you need end device’s {IP, Port} in order to send a message. These attributes should be defined when you create your new device type.
Configuring WSO2 IoT Server
You need to add push notification provider into the cdm-config.xml file. From a text-editor, open the cdm-config.xml located in $PRODUCT_HOME/conf folder. Find <PushNotificationProviders> element and add the following entry without changing others. The value should be the fully-qualified class name for the ModbusBasedPushNotificationProvider.
<PushNotificationProviders>
<Provider>org.wso2.carbon.device.mgt.extensions.push.notification.provider.modbus.ModbusBasedPushNotificationProvider</Provider>
</PushNotificationProviders>
You also need to add this into the UI; From a text-editor, open the create.hbs located in $PRODUCT_HOME/repository/depolyement/server/jaggeryapps/devicemgt/app/pages/cdmf.page.devicetype.create/ folder. Find the below code snippet and add “Modbus” into the list.
<div class="wr-input-control">
    <select id="pushNotification" class="form-control select">
        <option>NONE</option>
        <option>MQTT</option>
        <option>Modbus</option>
    </select>
</div>
Create a New Device and Sending Operations via Modbus
Start the WSO2 IoT server and log into the /devicemgt console. Navigate into “device type management” then click on the “create device type” link (https://localhost:9443/devicemgt/device-type/add). Fill the required fields as below and click on ‘Add Device Type’(you may skip the follow-up event creation step).

Once successfully created the device type; navigate into the device management page. Then click on ‘Enroll Device’ link(https://localhost:9443/devicemgt/device/enroll). Select the newly created device type, ‘firealarm’ and fill the appropriate values referring below;

After completing the above step, you should be able to view new device instance navigating into the ‘device management’ menu link. Click on the newly created device to open the ‘device overview’ page.

Trigger ‘Read Register’ operation and add ‘{“message” : “test”}’ as the payload. Once you click on ‘Send to Device’; WSO2 IoT Server will send the operation into the destination device through the Modbus push notification provider.
Summary
At the conclusion, in this article we explored the Modbus protocol(an industrial IoT protocol) and its attributes. Moving forward, we were able to successfully communicate with a device by implementing a new push notification provider for Modbus with the WSO2 IoT Server.
Some of the available Modbus Java libraries;
- https://github.com/steveohara/j2mod
- https://github.com/kochedykov/jlibmodbus
- https://github.com/digitalpetri/modbus